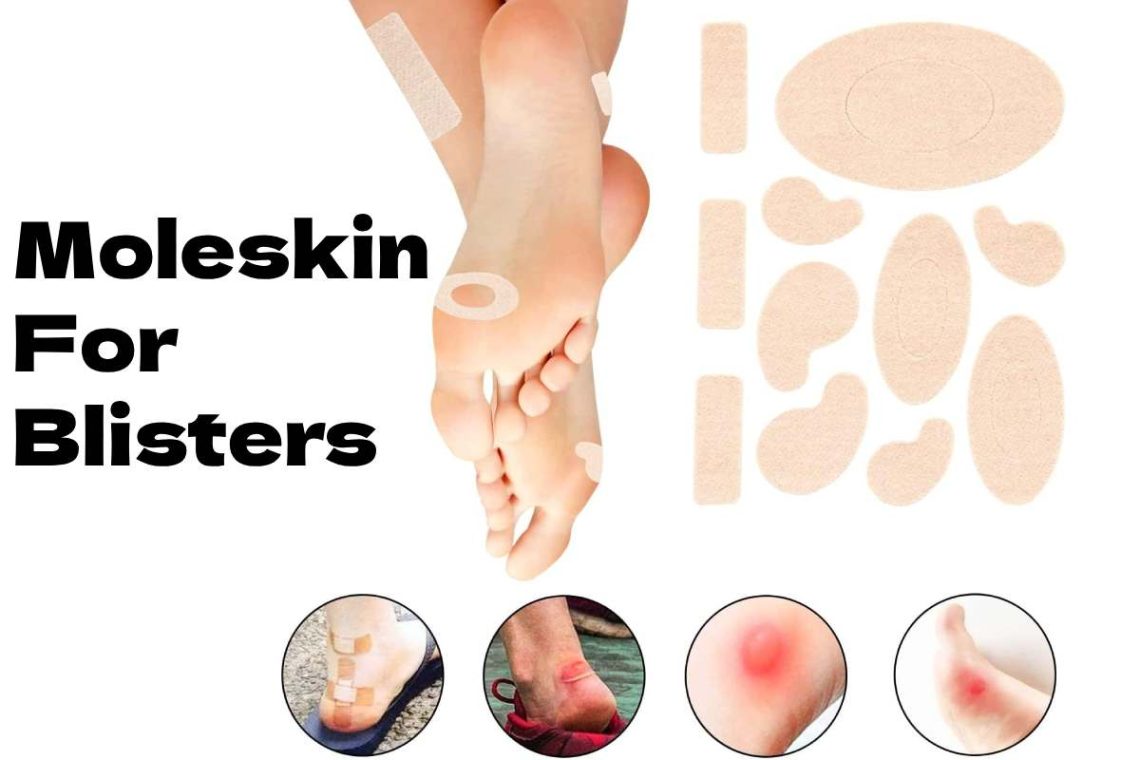
Moleskin for Blisters
Blisters are a real pain in the ass, especially when you’re on a hiking trail. Most hikers have experienced a foot blister once or twice and may already know how painful and annoying they can be. Seriously, why does something so small hurt so much?
Blisters have many causes, but moisture and friction are the two most common during walks. Anything that rubs against the foot can cause irritation and blistering, from tight toes in shoes or boots to ill-fitting or wet socks.
Moreover, you can follow many tips and tricks to stop those pesky fluid-filled sacs in their tracks. Whether you’re new to the trails or need a refresher, here are some helpful tips and tricks to treat those painful little sores.
What is Moleskin?
Soft on one side and adhesive on the other, moleskin is a universally valued product mainly used to prevent and protect blisters, rashes, and chafing, as well as for essential repairs and sound reduction. Many hikers, runners, and hikers use it to safeguard blisters from infection and provide comfort during exercise. You can also apply it directly to the inside of your shoes, especially dress shoes, to make them more comfortable. The moleskin also provides a quick solution to sound interference when recording with lapel microphones, as it reduces the sound of body and shirt friction. It’s also a fast and easy fix for bra underwires.
Key Features of Moleskin for Blisters
- Protective cushioning for friction and pressure relief
- Strong adhesive backing for secure placement
- Waterproof and breathable design
- Versatile sizing, easily cut to fit
- Hypoallergenic and gentle on skin
- Easy to apply and remove, leaves no residue
- Portable and convenient for first aid kits
- Ideal for active lifestyles, including athletes and hikers
Product Description For Moleskin for Blisters
| Attribute | Description |
| Product Name | Moleskin for Foot Care and Blister Prevention |
| Material | Soft, breathable fabric (cotton PE foam) |
| Features | Cushions and protects against friction, strong adhesive backing, easy to cut and apply, breathable, comfortable |
| Waterproof, flexible, hypoallergenic, long-lasting adhesion | |
| Usage | Preventing blisters, protecting sensitive skin, providing padding, ideal for feet, heels, toes |
| Suitable for athletes, hikers, and daily use | |
| Sizes | Widths: 1.3cm (0.5in), 2.5cm (1in); Lengths: 2.5m (8.2ft), 4.5m (14.76ft) |
| Available in various shapes and sizes to fit different needs | |
| Waterproof | Yes, prevents dirt from entering, suitable for use in moist conditions |
| Package Includes | 2 Heel Stickers (2.5m each), 2 Heel Stickers (4.5m each) |
| Application | Easy to apply and remove, leaves no residue, can be cut to desired shape |
| Additional Info | Provides instant relief from friction and pressure, enhancing comfort during activities |
| Portable and easy to carry, essential for first-aid kits
|
Apply moleskin in a blister.
Step 1
Treat the blister. Pierce it with a sterile needle and gently remove all the fluid, keeping the root of the blister intact to protect the raw skin beneath. Next, apply an antiseptic ointment to the blister and surrounding area and allow it to dry for 15 seconds. This will act as glue for the moleskin.
Step 2
Cut a hole more prominent than the blister in a piece of moleskin. It’s easiest to fold it in half and cut a semicircle or oval somewhat larger than half the size of the blister over the folded edge. When you unfold it, it will have a symmetrical shape that fits around the blister.
It was making a hole a little more giant than the blister, creating a wall of protection that prevents it from getting worse due to rubbing against anything.
Step 3
Place the moleskin around the blister. Peel the backing and place the sticky side face down on the skin so the blister is directly in the center of the hole.
The moleskin piece should fit snugly around the blister, with about half an inch (1 cm) of material remaining between the hole and the edge of the moleskin.
Apply a second identical coat on top if the blister is flush with the surface of the first coat or if it protrudes.
Step 4
Place another piece of moleskin on top to cover the hole and blister. This piece should be the same size as the parts underneath but without a hole in the center. It will act as a cap that protects the vial from friction and contamination.
Step 5
Stick the moleskin to the skin. Secure the entire moleskin patch with duct or athletic tape. If possible, wrap it entirely around the foot, ankle, or toe, respectively, if the blister is in any of these areas to ensure the tape does not peel off from rubbing against your shoe. Now, you will be able to carry out your activities without pain.
While moleskin is adhesive, it is not very strong and can peel if not taped.
Six tips to prevent blisters
Find the right pair of boots for work
You would not wear flips in the snow or UGG boots in 110-degree weather, but you should get the right hiking shoes for the activity you’ll be doing. A good pair of boots is essential when hiking.
If you’re walking on a civilized, flat paved path, tennis or running shoes will work well, but not if you climb rocks, hills, and uneven terrain; you want to wear proper hiking boots to provide medial and lateral stability for your foot and ankle.
When it comes to selecting the correct type of boot, here are three things to consider:
- Go to an outdoor outfitter or store and have it properly fitted by an expert.
- Don’t judge the boot by how it looks but by how it feels.
- Select a pair with an extensive toe box so that toes have room to move and swell as you walk.
Put on your boots and feet slowly.
Those boots were made for walking, and that’s precisely what they will do, but make sure it’s a short walk. This lets you identify problem areas or hot spots and experiment with solutions.
The bottom line is to harden and train ahead of time. Don’t decide to hike the Grand Canyon in a new pair of boots.
Help your feet grow protective calluses by gradually increasing your walking months in advance. Don’t wait until the last minute. As the distance increases, you may develop blisters, but short walks allow you to identify and treat those hot spots quickly.
Wear appropriate socks
Almost as significant as your boots are the socks you wear underneath. Nowadays, there are many fun socks you can choose from, but they may not be suitable to wear for hiking.
Look for synthetic or wool hiking socks instead of cotton, which retains moisture. They may be a little more expensive than typical sports socks, but they last longer and can save you money on the long hike.
Use the Goldilocks fit test: If the sock is too big, you may get wrinkles, and if it is too small, you can create pressure points. Look for a sock with the right thickness and fit.
Consider a quality lubricant
If you are prone to irritation, rub your feet and between your toes with Vaseline (Vaseline), A&D, or Aquaphor before putting on your socks to help prevent hot spots from forming.
Every marathoner will tell you to use Vaseline whether you’re running or walking.
Keep your feet dry and clean
When you’re on the trail, your feet will likely get a little dirty and wet, either from the sweat of your feet or from walking through small streams and puddles. If your feet get hot or wet and feel a little sandy, take a break to remove your boots and wear a new pair of socks.
Be prepared
Preparation is critical when it comes to hiking. While packing your hiking backpack with water and essential snacks, bring an extra pair of socks (or, if you’re especially prone to blisters, maybe two) and first aid supplies, like moleskin, antibacterial ointment, and Band-Aids. You probably don’t need them, but better safe than sorry.
Personal care: blister treatment
Despite your best efforts, you managed to get a blister.
These steps are to keep the wound clean and avoid infection:
- Keep the roof intact. Whatever you do, don’t pull, open, or pop the blister. The skin on the blister is the body’s natural protector, so removing it can expose the raw skin underneath to infection.
- Wash your hands and clean the area with antibiotic soap.
- Drain, if necessary. If the blister is painful or bothersome, use a sterile needle to prick and gently push the fluid out of the hole.
- Cover the blister as you would a wound with antibiotic ointment and gauze or a Band-Aid.
- Use a piece of moleskin, but make sure it’s a donut-shaped dressing that goes around the blister. You want to ensure the moleskin is slightly bigger than the blister so the skin doesn’t come off when you remove it later. Moleskin is also an excellent option for treating hot spots.
Conclusion
Using moleskin for blisters is a great way to protect your skin and prevent blisters. It cushions the area, reduces rubbing, and makes walking or moving more comfortable. It’s handy for athletes and hikers.